


How do I Use My Compass?
Useful Hiking & Camp Item. Vol. 1 Issue #1

Introduction
The use of a compass is sadly becoming a lost art of scoutcraft. The advent of smart phones (with a compass) & gps have minimized the immediate need to learn how to use the vital hiking instrument. The 10th edition of the BSA Handbook written by Green Bar Bill Hillcourt has a brillant section on how to use a compass and teaches scouts how to make maps. The current edition of the BSA Handbook has removed the section on mapmaking for different skills like the newest BSA merit badge geocaching.
But, at Illinois River Scouting, we teach things the ole’ way of doing things because what happens when the power goes off, your phone’s battery dies, and you need to get somewhere? What happens when you set traps in the woods then you lose your phone & forget to put the geocache in the cloud?
I suppose the first skill is knowing how pick the proper compass. I suggest for your first compass to choose what I’d call a ‘working compass’ that is cost effective. The typical compass for your daypack, or even for long hikes, does not need to be one that costs $30 or more. The Illinois River Scouting recommendation? The boy scout hiking compass by TurnOnSport for the currently low cost of $9.13 on Amazon.
Basic Compass Components
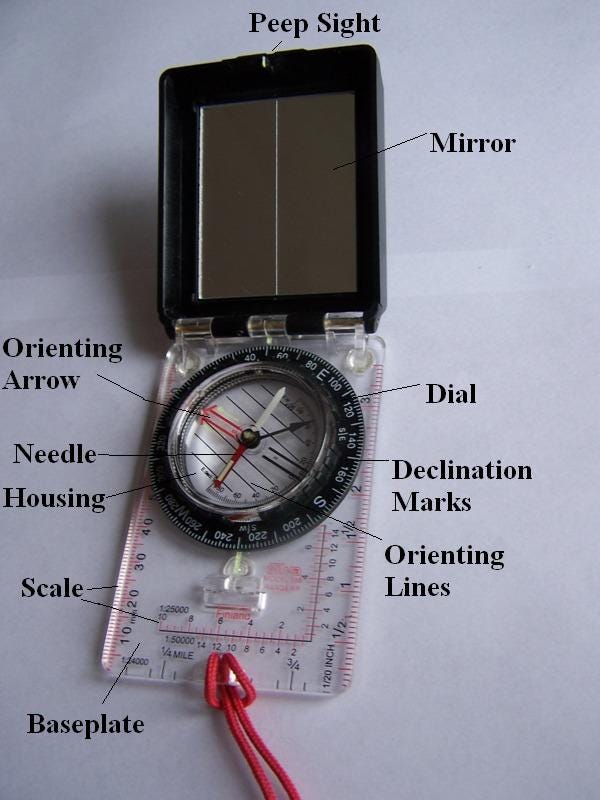
It is important to understand the different parts of the compass for the purposes of using it. The lingo is important when doing basic orienteering and map making. I will reference the above compass for description.
Note: Some compasses may differ, so make sure you read the instructions of the compass you purchase or at the very least play around with it and get familiar with how it reads north before taking it with you on any trip.
There are four main parts needed for basic use of the compass: Needle, Housing, the direction arrow, & Orienteering arrow.
Learning How to Use You Compass
The boy scout TurnOnSport compass’s needle is red when when it points magnetic north. The orienteering arrow, with assistance from the direction arrow, is important for the purpose of expressing landmarks in degrees, which is a great skill for learning how to hike off trail & finding your way back to your vehicle.
Try using your compass to express where appliances are by degrees in your own kitchen.
Take out your compass; hold it waist high, & find north with the direction arrow. Once you have located north with the direction arrow and your red needle find an appliance to your right (e.g. refrigerator) and point the direction arrow toward the appliance. Your red needle will remain on magnetic north. Now move the housing of the compass (the dial with all the degrees) so the orienteering arrow is now lined-up with the red needle then read the degrees on the housing: Congratulations you have discovered how many degrees East your appliance is located from magnetic north!
Magnetic North Vs. True North
Now, if I had to wager, the reader has already noticed I keep referring to the compass as pointing toward magnetic north. If you’re camping & in the field attempting navigate your way via landmarks, you’ll probably be okay with using only magnetic north.

If you’re using a map to hike trails, the maps use a term called true north. True north points toward the north pole on earth, which you’ve guessed it differs from where magnetic north, the difference in relation to your compass is called declination. Rick Curtis, Princeton University, explains, “Depending on where you are, the angle between true north and magnetic north is different. In the U.S., the angle of declination varies from about 20 degrees west in Maine to about 21 degrees east in Washington. The magnetic field lines of the earth are constantly changing, moving slowly westward (to 1 degree every five years).”1
The explanation is important because if you’re using an old scout handbook or an old map, the declination has changed over time. In Illinois, the declination could possible be 4 degrees E, whereas currently it’s around 1 degree. You can find the accurate information using the most up to date map for your area or you can use the NOAA geomagentic calculator website to determine the declination in your area.
How does this practically affect the use of your compass'? If you are west of 0 degrees true north then you will need to move the housing of your compass to match the proper declination degrees. For example, if you’re hiking in Wyoming, you will need to set your housing to 13 degrees E to find true north while using a map. Some compasses are advanced enough to have mechanism strictly for declination.
And this is the basics of compass use! I hope this short article intrigues readers to learn more about compasses and start using them in the field.
Look Forward to What’s Upcoming!
Gear Reviews:
Eton FRX3+ All Purpose Weather Radio (crank & solar powered)
POPYOLA Waterproof Pocket Notebook
2.0 Backpacker Survival Fishing Kit
Primula Brew Buddy Portable Pour Over (coffee maker)
Events
The BSA Abraham Lincoln Council Lincoln Pilgrimage 2024
Articles:
Baden-Powell, Know Your Surroundings, and Memory Games (Kim’s Game)
The Patrol Method & The Wolverine Patrol
The Buddy System: Making Life-Long Friends in Scouting
Rick Curtis, “OA Guide to Map & Compass - Part 2,” Princeton University, accessed March 24, 2024, https://www.princeton.edu/~oa/manual/mapcompass2.shtml